Pushのアップグレードは、組み立て作業の経験がなくても、自分で簡単に完了できるように設計されています。 所要時間はおおよそ30分です
Upgrade Kit:ステップ・バイ・ステップ
チュートリアルビデオ
アップグレードの流れは、こちらのチュートリアル動画をご覧ください
ステップ・バイ・ステップ・ガイド
Push 3をスタンドアロン版にアップグレードするには、次の手順に従ってください。 問題が発生した場合は、 トラブルシューティングの記事をご参照ください。
ステップ1:準備
- 作業には清潔で平らな作業台を用意してください。
- パーツを並べて、箱に記載されている内容物がすべて揃っていることを確認します。
👉 ネジは使用する指示があるまで、パッケージに入れたままにしておきましょう。
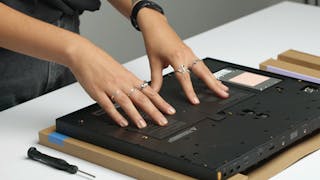
- 付属のマットを作業台に敷きます。
⚠️ Pushの電源がオフになっていて、電源ケーブルが取り外されていることを必ず確認してください。
- Pushを裏向きにしてマットの上に置きます。
⚠️ 不必要な静電気を除去するため、席に着き、10秒ほど待ってから作業を開始してください。
ステップ 2: バックプレートのネジを外す
- まず、付属のドライバーを使用して、バックプレートから外周のネジをすべて外し、脇に置いておきます。
- 次に、中央の3つの小さなネジを緩め、他のネジと区別して置いておきます。
ステップ 3: ホールカバーを取り外し、バックプレートを持ち上げます。
- バックプレートから5つのホールカバーを取り外し、プラスチック用のリサイクルボックスに廃棄してください。
- 左上のゴム足のすぐ下の穴にバックプレートリフターを差し込み、バックプレートが持ち上がり始めるまでバックプレートリフターを回します。
- 取り外したバックプレートは脇に置いておきましょう。
ステップ4:プロセッサーの取り付け
プロセッサーを45度の角度で持ち、上部のコネクタに右側からスライドさせて取り付けます。
- Wi-Fiアンテナを配線用の溝にはめてください。
付属のプロセッサー用ネジを2本取り付けます。正しく締めた場合、これらのネジはプロセッサーの表面と同じ高さになることはありません。
- 指をスライドさせながら、上部のWi-Fiアンテナを溝に挿入します。 プラスチック製のエンドピースを上部のスロットに挿入します。
- スロットがきつく感じられる場合は、Pushの側壁を軽く引っ張り、プラスチック製のエンドピースをスライドさせる隙間を作ってください。
- 下部の Wi-Fiアンテナでも、同じ手順を繰り返します。
- プロセッサー上部のヒートパッドから慎重にフィルムを剥がします。
ステップ5: メモリカードの取り付け
- メモリーカードを30度の角度で持ち、右側からコネクタに差し込みます。
- 片手で小さなプラスチックのタブを横に押します。
- もう一方の手で、メモリーカードを所定の位置にカチッと音がするまで押し込みます。
メモリーカードは、ある程度強く押し込む必要があります。
ステップ 6:バッテリーの取り付け
- バッテリースペーサーを取り外し、プラスチック用のリサイクルボックスに廃棄してください。
- バッテリーを、文字が上になるように挿入します。
- バッテリーのネジをバッテリーの右側の穴に取り付けます。
- バッテリーのネジは、必ず専用のものを使用してください。
ステップ 7: バックプレートの取り付け
- 中央の3つの穴が下に来るようにバックプレートを配置します。
- Pushの背面が平らになるようにバックプレートを置き、バックプレートがフレームに入る程度に外周のネジを締めます。
- 外周のネジをしっかりと締めます。
- 真ん中の小さいネジ3本を締めます。
ステップ8:ヒートシンクの取り付け
- ヒートシンクのヒートパッドからフィルムを慎重に剥がします。
ヒートシンクをバックプレートに置き、5つの穴の位置を合わせます。
5本のヒートシンク専用ネジをしっかりと締めます。
ステップ9:Pushの起動
- Pushを裏返し、ディスプレイ側を上にします。
- Pushの電源プラグを差し込みます。Pushの電源の初回投入時のみ、バッテリーを有効にするために以下の作業が必要です。
- Pushの電源を入れます。
👉初めて電源を入れる場合、起動に約2–3分かかります。
- アップグレード後に初めてPushを使用する際には、バッテリーを適切に調整するための追加手順が必要です。 バッテリーを完全に充電してから電源アダプターを抜き、バッテリーが完全に放電するまでPushを使用するか、そのままにしておきます。
- Pushの電源が入ったら、画面の手順に従います。 アップグレードは完了です。スタンドアロンの機能をお楽しみください。
