2. First Steps
2.1 Installation and Authorization
Before getting started with Live, make sure you have the latest version of the software installed and authorized. You can download the Live installer from your ableton.com User Account and then launch it to install the software. Once installed, you can authorize Live. Note that each Live license comes with two authorizations, so you can use the software on up to two computers, providing that you only use one computer at a time.
2.2 Learn About Live
Live comes with a set of interactive lessons to take you step by step through the key features of the program. The lessons are organized in a table of contents, which can be opened directly in the program via the Help menu. We highly recommend following the lessons. Many users have told us that the lessons helped them become familiar with the program very quickly.
We also recommend that you read the Live Concepts chapter, which encapsulates everything that Live is and can do, and is therefore a worthwhile read for both beginners and experienced users. The remaining chapters of this manual serve as in-depth reference for the material introduced in Live Concepts.
2.2.1 Using the Info View
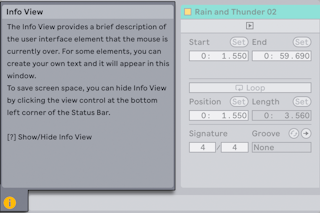
Live’s Info View displays the name and function of whatever you place the mouse over.
You can show or hide Info View by using the view control toggle in the bottom left corner of Live’s window or by using the ? key.

You can also create your own text notes for tracks, clips, devices and more, by selecting “Edit Info Text” in the context menu for the corresponding item. You can then type text into the Info View, which will be saved and displayed in your Live Set.
2.3 Live’s Settings
The Settings window is where you can customize various settings for Live. Settings can be found in the Options menu on Windows and in the Live menu on macOS. You can also open the Settings window using the shortcut Ctrl, (Win) / Cmd, (Mac).
Live’s Settings are distributed over several tabs, which are described below.
2.3.1 Display & Input
The Display & Input Settings contain options for language and zoom settings, as well as keyboard navigation and other application settings.
- The Display section lets you select your preferred language for Live’s UI, as well as set the zoom amount for Live’s main window (as well a second window, if open).
- In Display Options, you can enable “Outline View in Focus” so that a border is drawn around whatever view is currently selected. You can also choose how scroll bars are displayed, set the Follow behavior for Arrangement View and clips, and show or hide user interface labels.
- You can enable various keyboard workflow options in the Navigation and Keyboard section, such as using the Tab key to move keyboard focus, having the Tab key navigate in a section continuously, and using the arrow keys to move clips.
- Mouse and Pen Input lets you enable Pen Tablet Mode, as well as permanent scrub areas.
- You can restore any “Don’t Show Again” warning dialogs that you previously switched off in the Application Options section.
2.3.2 Theme & Colors
In the Theme & Color Settings, you can determine the overall look of Live’s appearance.
- You can choose a color scheme from the Theme section, or have Live follow the light/dark mode settings from your OS. You can also set a warm, cool, or neutral tone to the color palette, and enable high contrast if needed.
- The Customization tab lets you determine the opacity of the grid lines in the UI, adjust the brightness level, and set the color intensity and hue.
- You can switch auto-assigning track colors on or off in the Track and Clip Colors section, or choose a default color for all tracks. The Clip Color toggle can be set to generate random colors or use the track’s color for new clips.
2.3.3 Audio
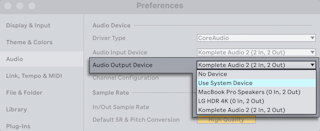
The Audio Settings options can be used to set up Live’s audio connections with the outside world via an audio interface. This includes access to individual input/output devices, sample rate and latency settings, and a testing section for audio interface calibration.
On macOS, you can use the Use System Device option in the audio output chooser to have the output device in Live match what is selected in the macOS Sound System Settings. This way, you can automatically use the same device for both Live and your operating system.

We suggest taking the time to follow the program’s built-in Setting up Audio I/O lesson, which will walk you through all the steps required to set up and optimize the settings for any given system. To access the lesson, use the Help View command from the Help menu.
2.3.4 Link, Tempo & MIDI
The Link, Tempo & MIDI Settings are used to help Live recognize external devices for three separate and distinct purposes:
- Syncing the program with external devices, either via Ableton Link, Tempo Follower, or MIDI. Please see the Synchronizing with Link, Tempo Follower, and MIDI chapter for details.
- Playing MIDI notes. To learn how to route an external device into Live for MIDI input, or how to send MIDI to an external device, please see the Routing and I/O chapter.
- Controlling parts of the interface remotely. This subject is covered in detail in the MIDI and Key Remote Control chapter.
2.3.5 File & Folder
The File & Folder Settings are used to configure settings related to data handling, custom Max for Live paths, and Live’s decoding cache.
2.3.6 Library
The Library Settings allow you to specify a default location for various types of installed files, including Packs and your User Library, as well as whether or not samples and other files are self-contained when saving Sets. You can also choose to show or hide synchronization options for Ableton Cloud and Push in Live’s Places.
2.3.7 Plug-Ins
The Plug-Ins Settings allow you to set the location of plug-in folders, specify which folders you want Live to use, and modify the display behavior of plug-in windows.
2.3.8 Record, Warp & Launch
The Record, Warp & Launch Settings allow customizing the default state for new Live Sets and their components, as well as selecting options for new recordings.
2.3.9 Licenses & Updates
The Licenses & Updates Settings are used to manage authorization, automatic updates, and usage data.